Table of Contents
But here's what the physics textbooks don't tell you: stagnant water can freeze in as little as 21 minutes [1]. While you're waiting for that ice to turn back into water, a massive amount of pressure is building up between the ice blockage and your closed faucet. It's like a steel plug in a soda bottle you keep shaking. It's not the ice that usually breaks the pipe—it's that trapped water pressure looking for an exit.
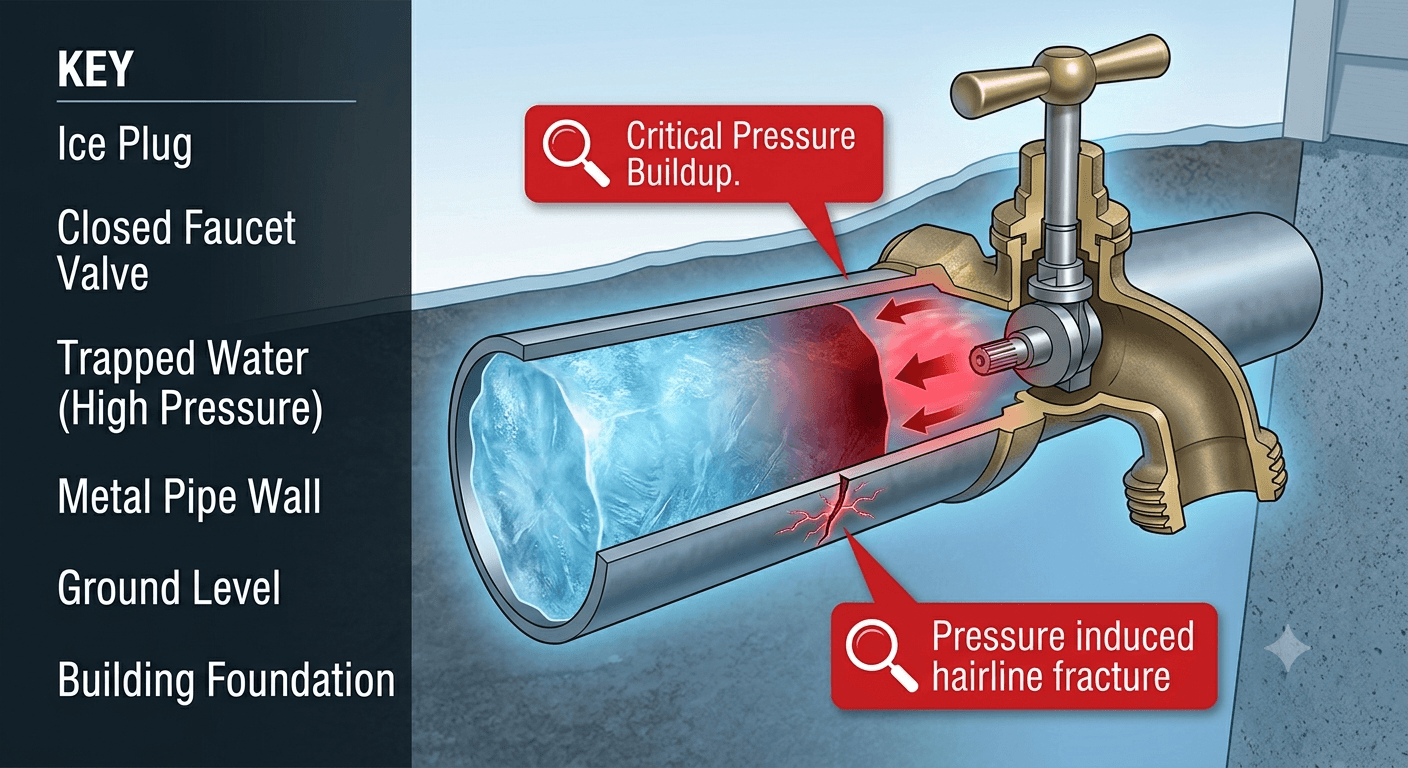
A 3D cutaway showing an ice plug. Red highlights indicate the critical pressure buildup between the plug and the closed faucet, leading to a hairline fracture.
How Long Does It Take for Pipes to Unfreeze?
The timeline depends on whether you're letting nature take the lead or taking matters into your own hands. If you're waiting for a natural thaw, it could take days, depending on how deep the freeze has penetrated your walls [1][2]. For an under-sink run on a kitchen exterior wall, expect 30 to 60 minutes of steady, manual heat to see results.
| Method | Time | Risk Level |
|---|---|---|
| Natural Thaw | Variable (Hours to Days) [1] | High (Burst Risk) |
| Hair Dryer / Heat Tape | 30-45 minutes | Low |
| Professional Thawing Unit | 10-15 minutes [3] | Minimal |
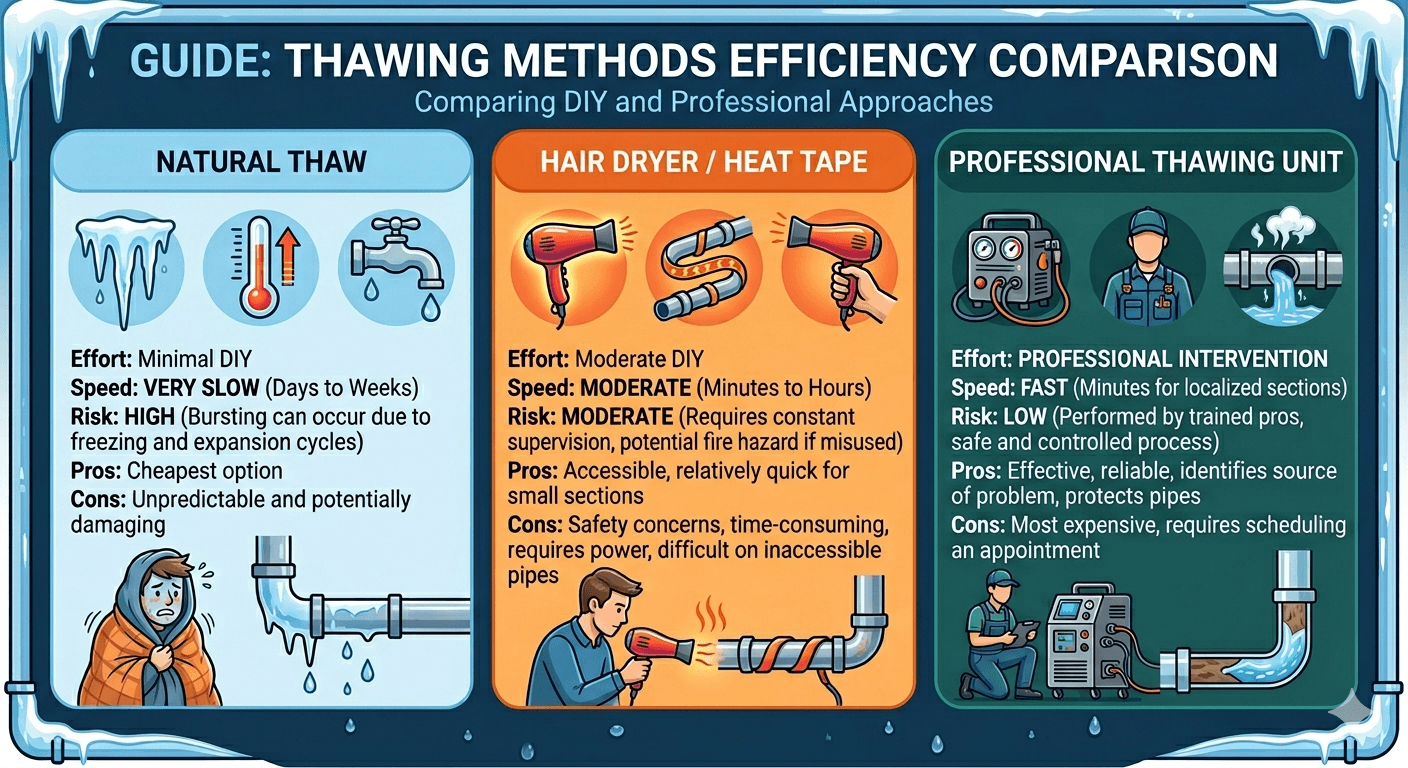
A quick-reference guide comparing DIY efforts against professional intervention and natural thawing.
If you're dealing with a manual steam thaw, experience shows it moves at a crawl—about one hour for every meter (approx. 3.2 feet) of pipe [2]. Compare that to a professional electrical unit that can clear 175 feet of metal pipe in under 10 minutes [3], and you'll see why we don't wait for the sun.
The Math of Risk: $200 Plumber vs. $5,000 Water Damage
I get it—nobody wants to spend money they didn't plan to. But let's look at the numbers. A professional service call to thaw a pipe usually lands between $300 and $350 [4]. Some local emergency promos even start as low as $49 for a basic assessment.
Now, look at the alternative. If that pipe bursts while you're at work, you're looking at water extraction, mold remediation (the professional removal of toxic fungi), and structural repairs. I've seen these bills top $5,000 easily. To make matters worse, insurance companies aren't always your friend. Many policies cap water damage payouts—some at around $4,500 [6]—and if they decide you were "negligent" by not keeping the heat high enough, they might deny the claim entirely [1]. Paying a plumber is essentially buying an insurance policy against a catastrophe.
Signs Your Pipes are Frozen (And Where to Look)
Before a pipe bursts, it usually gives you a few warnings. Check high-risk spots first: under-sink cabinets on exterior walls, uninsulated crawl spaces, and where the main line enters the house.
- The Trickle: You turn the tap, and only a few drops come out.
- The Frost: You see actual ice crystals on the outside of a pipe in the basement.
- The Smell: Strange odors coming from the drain usually mean an ice block is trapping sewer gases.
- The Sound: Gurgling or "banging" (known as water hammer) when you try to use the water.
Material Matters: PEX vs. PVC
In my career, I've replaced miles of shattered PVC (polyvinyl chloride). It has zero "give" in the cold. If you have PEX (cross-linked polyethylene) or PE piping, you're in luck. These materials are elastic; they can expand as ice forms and often snap back to their original shape without breaking once they thaw [1][7].
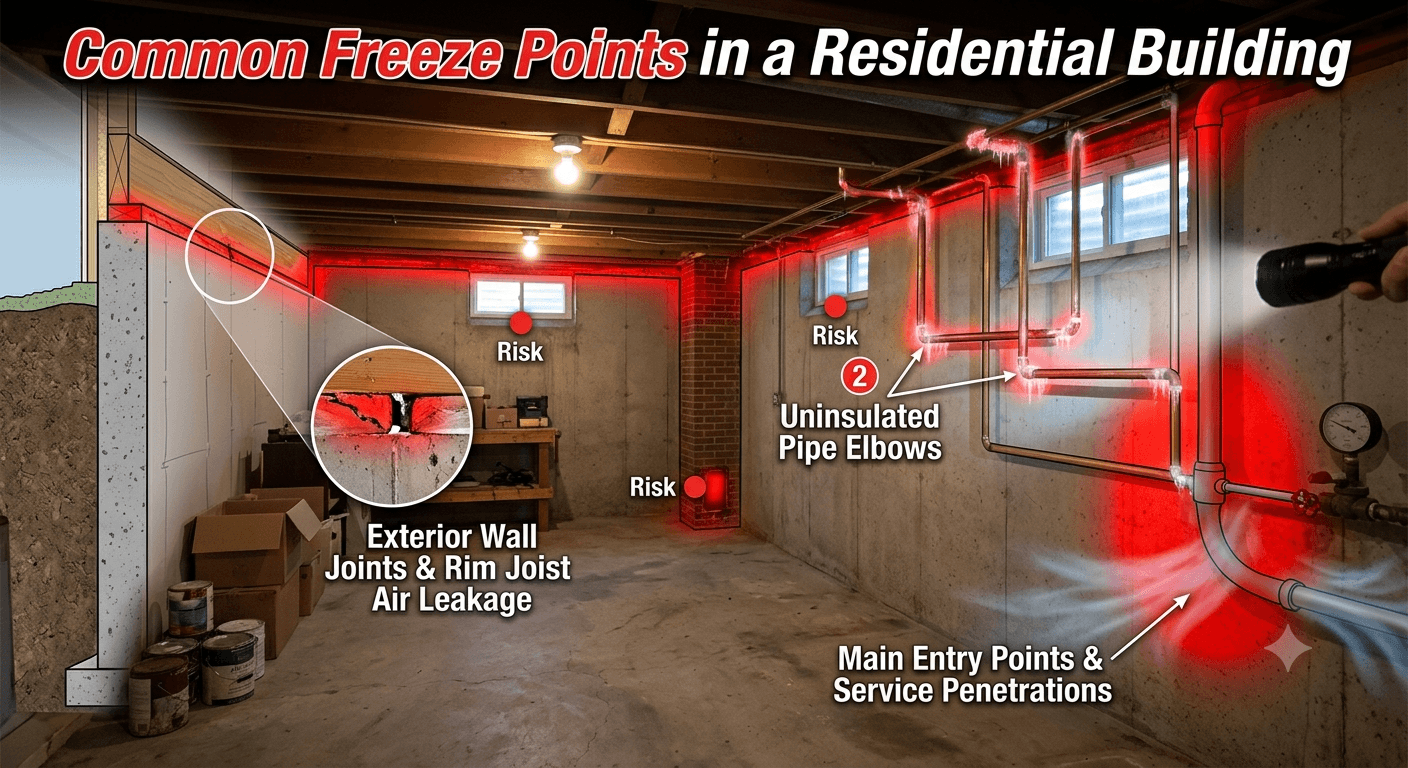
Common Freeze Points in a Residential Building
Safe DIY Thawing: The Pro's Protocol
Safety First: We only recommend DIY for pipes you can see and reach. If you've caught the freeze early and there's no visible bulge, follow these steps:
1. Shut Off the Main Valve: This is non-negotiable. If the pipe bursts while you're heating it, you need the water off before the flood starts.
2. Open the Faucets: Open both the hot and cold taps. This relieves the pressure that causes the burst.
3. Inspect for Damage: Before applying heat, run your hand along the pipe. If you feel a "lemon-sized" bulge or a crack, stop. You need a plumber, not a hair dryer.
4. Apply Gentle Heat: Use a hair dryer or wrap the pipe in towels soaked in hot water. Move the heat constantly; don't focus on one spot too long.
5. The "Never" Rule: Never use a propane torch. I've seen more house fires started by "DIY plumbers" with torches than I care to count. It heats the pipe unevenly, which causes it to snap.
*Note on humidity:* If you're using heat in a damp basement, remember that high humidity transfers heat faster [4]. Keep a fan running to help the process and prevent moisture buildup in your walls.
When to Stop: The "Red Line"
There is a point where you need to put down the hair dryer. If you see any of these, you are past the DIY stage:
- The Bulge: If the pipe looks deformed, the material is already compromised.
- The Leak: Any dripping or "weeping" from a joint.
- The Location: If the freeze is inside a wall or under a concrete slab. In northern climates, frost can reach 10 feet deep [2]—you aren't reaching that with a hair dryer.
- Plastic Pipes: Never use electrical thawing machines on plastic pipes; they are for metal only [3].
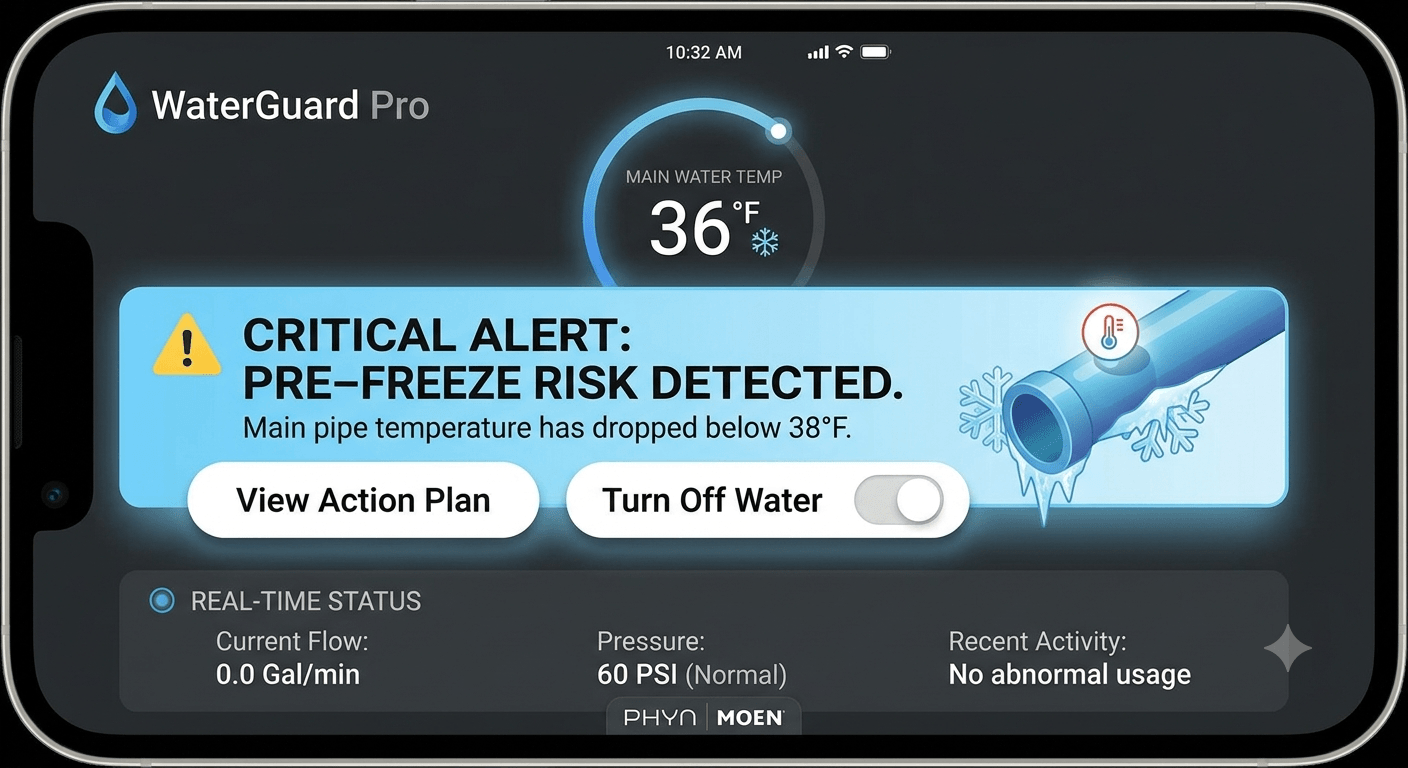
Modern systems like Phyn or Moen can alert your phone the second temperatures drop, allowing you to act before the ice even forms.
Preventing the Next Freeze
To avoid this stress next time, follow the "Rule of Three":
1. The Drip: When temps drop below 20°F, let a faucet on an exterior wall drip slowly.
2. The Air: Keep cabinet doors open to allow warm air to circulate.
3. The Heat: Never set your thermostat below 55°F, even if you are away.
I know the temptation to wait for the sun is strong—it's free, and it's easy. But as someone who has spent nights vacuuming three inches of water out of a finished basement, I'm telling you: don't gamble. If you can't get the water flowing within 45 minutes of safe heating, call a professional. You aren't just paying for a thaw; you're paying to keep your floors dry and your insurance valid. You've got this, but know when to pass the wrench.
FAQ: Straight Answers
At what temperature do pipes unfreeze?
Active thawing starts between 40°F and 55°F (4°C to 13°C) [1][5]. But remember, once it hits 20°F (-6°C) outside, your uninsulated pipes are on the clock [5].
Do pipes make noise when unfreezing?
Yes. You'll hear banging or gurgling. It's just air and water fighting for space.
Can I just leave the cabinet doors open?
This is a great preventative measure to let house heat reach the pipes, but it rarely thaws a solid ice plug once it's already formed.
References
[1] Thermodynamics of pipe freezing and thawing — http://al-vo.ru/teplotekhnika/kogda-zamerzaet-vodoprovod.html
[2] Defrosting and pipe insulation guide — https://ab-log.ru/build/defrost
[3] General Wire Hot-Shot Pipe Thawing Machine Specs — https://www.plumbingsupply.com/hot-shot-pipe-thawing-machine.html
[4] Process Engineering: Thawing Efficiency Study — https://www.mdpi.com/2227-9717/13/4/1067
[5] Red Cross: Preventing and Thawing Frozen Pipes — https://www.redcross.org/get-help/how-to-prepare-for-emergencies/types-of-emergencies/winter-storm/frozen-pipes.html
[6] Insurance Terms and Water Damage Coverage — https://www.bta.lv/media/privatipasuma-nosavnoto-risku-apdrosinasanas-noteikumi-nr-3f-3-ru.pdf
[7] Frost-resistant pipe materials (PEX/PP-B) — https://tk-flex.ru/articles/truba-morozostoykaya-dlya-ulichnogo-vodopровoda